
This will be my last post here at Two Nuts in a Shell. I'm moving! :) You can now find me over at Hawthorn & Holly--you'll know you're in the right place because mine and Jason's mugs greet you at the top of the page! No worries, Two Nuts in a Shell will still be here; I'm not going to let the domain expire. I've linked up to all my old projects over at the new place, so you won't have to hunt them down. I hope you'll make the move with me and come check out the new digs!
October 28, 2010
October 19, 2010
While I'm away...
It seems like this blog goes through a veritable roller coaster when it comes to reader/writer interaction. I'll go weeks without hearing from any of you and then suddenly my blog is flooded with comments (which I totally love because it makes me feel relevant). I'm definitely not a "super blog" with thousands of readers and that has never bothered me. This blog is my hobby, not my career. I don't mind having less than 200 followers but I'm not ashamed to offer prizes and goodies to bulk up my numbers when I'm tired of being stuck in a certain bracket. I don't need advertisers, and if I suddenly need to to tell you about some amazing new find I can do it without worrying that I'm going to step on some one's toes.

But one thing I do want to do is hear more from you! Especially because I'm going to be moving to new digs soon! Blogger has some amazing new tools, gadgets and set-ups, and rather than try to implement them here and mess up all my pages, I've decided to start over and start fresh. Yes, I'll be horribly sad to say goodbye to "Two Nuts in a Shell," but I'm hoping the new site (name to be announced soon!) will mark a new chapter in my blogging life (and no, before everyone goes wild with speculation, it will not be a baby blog.)
So, after all that jabberwocky, while I'm on hiatus with my newly returned hubby ::swoon, giggle, and blush:: I'm leaving the floor open to your suggestions!
What would make you comment more?
Do you want polls listed on the blog?
What do want to see more of?
Should I start hosting link parties?
Would you like more opportunities to ask questions about us?
Should I incorporate video blogging?
Tell me whatcha thinkin'!
and please be kind. reading this blog is optional. suggestions to go jump in a ditch will be immediately ignored and deleted. :)
But one thing I do want to do is hear more from you! Especially because I'm going to be moving to new digs soon! Blogger has some amazing new tools, gadgets and set-ups, and rather than try to implement them here and mess up all my pages, I've decided to start over and start fresh. Yes, I'll be horribly sad to say goodbye to "Two Nuts in a Shell," but I'm hoping the new site (name to be announced soon!) will mark a new chapter in my blogging life (and no, before everyone goes wild with speculation, it will not be a baby blog.)
So, after all that jabberwocky, while I'm on hiatus with my newly returned hubby ::swoon, giggle, and blush:: I'm leaving the floor open to your suggestions!
Do you want polls listed on the blog?
What do want to see more of?
Should I start hosting link parties?
Would you like more opportunities to ask questions about us?
Should I incorporate video blogging?
Tell me whatcha thinkin'!
and please be kind. reading this blog is optional. suggestions to go jump in a ditch will be immediately ignored and deleted. :)
October 17, 2010


October 8, 2010
This season's table scape
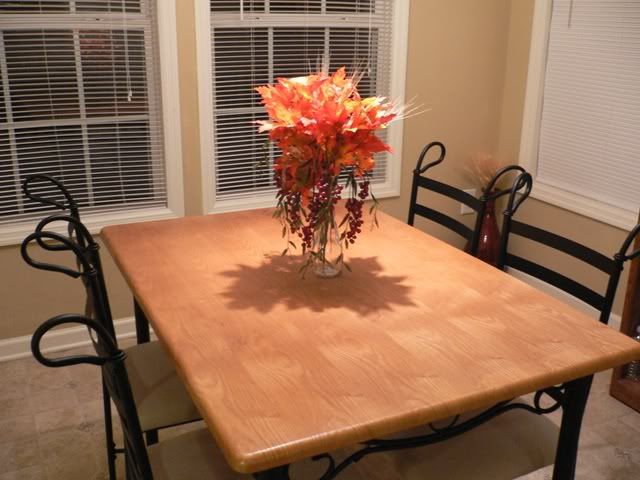
For some reason, fall seems to be the only season that I can decorate my table completely (what does that say about my favorite season? fall it is!). I changed it up a little this year versus last year, which was really one of the first years I'd ever done a full table scape. Or even had a table. Well, that's not entirely true. Here's a shot of the $100 Wal-Mart table set we had back in the rarely seen North Carolina house. Fancy, huh??
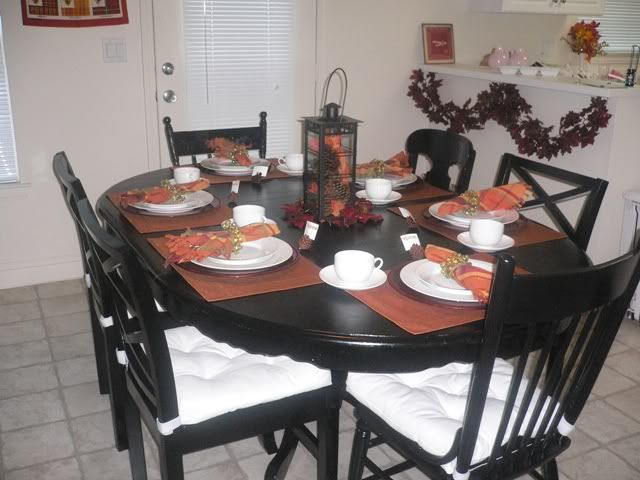
Here's how it looked last year.
Muuuuuch more colorful and put together! And here it is this year.
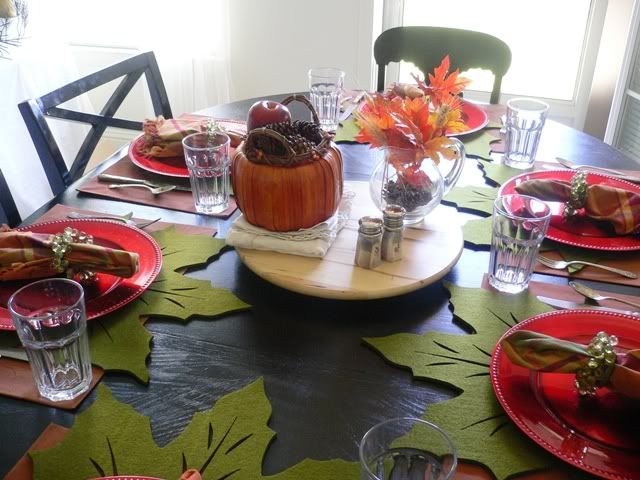
The only thing I changed were some of the glasses and added some $2 places mats from Bed Bath & Beyond (subsequently where I got the pumpkin colored ones as well last year). Overall, I added it up and each place setting cost a whopping $12. The chargers were in a pack of 6 for $14 (from BB&B). The pumpkin place mats were $2, the napkins were $2, the napkin rings were $3 (all BB&B items). The glasses I picked up at IKEA for a whole $0.57 a piece (and I freaking wanna sky write how much I love them). The vintage place settings I ordered on eBay. I got almost 300 pieces for $20, effectively making them about $0.07 a piece! That's less than a dime folks!!
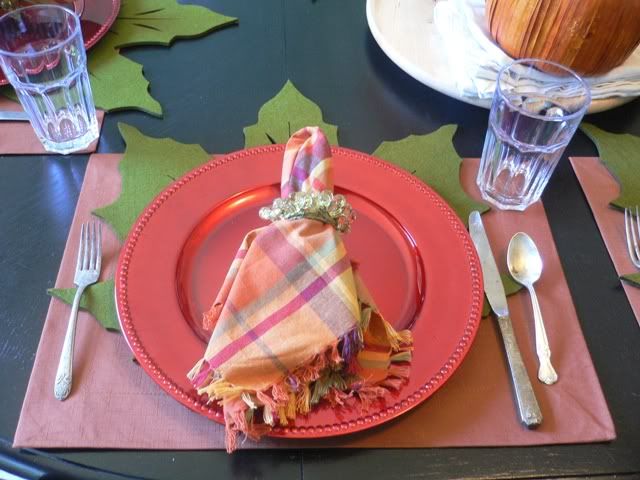
When I saw these laser cut leaf mats at BB&B I was hooked. Granted, they make me want to sing "O Canada!" but by adding that extra layer to the table, it instantly made it more colorful and fall-ish.
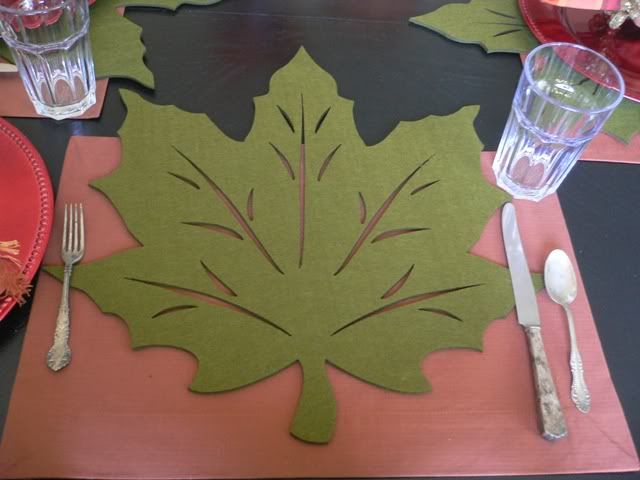
I wonder if I can make them work on top of some gold place mats for Christmas??
Here's how it looked last year.
Muuuuuch more colorful and put together! And here it is this year.
The only thing I changed were some of the glasses and added some $2 places mats from Bed Bath & Beyond (subsequently where I got the pumpkin colored ones as well last year). Overall, I added it up and each place setting cost a whopping $12. The chargers were in a pack of 6 for $14 (from BB&B). The pumpkin place mats were $2, the napkins were $2, the napkin rings were $3 (all BB&B items). The glasses I picked up at IKEA for a whole $0.57 a piece (and I freaking wanna sky write how much I love them). The vintage place settings I ordered on eBay. I got almost 300 pieces for $20, effectively making them about $0.07 a piece! That's less than a dime folks!!
When I saw these laser cut leaf mats at BB&B I was hooked. Granted, they make me want to sing "O Canada!" but by adding that extra layer to the table, it instantly made it more colorful and fall-ish.
I wonder if I can make them work on top of some gold place mats for Christmas??
October 6, 2010
Buffets and 'brellas
For a while now I've been wanting something like a buffet for our dinning room. Most military houses have a small breakfast bar (the one we have now is fairly shallow--not even deep enough to pull stools up to), but I wanted something more adequate for decorating and serving on the rare occasion that we have large groups over, like last Thanksgiving. Having all the food up on the bar and everyone scrambling around each other's chairs wasn't exactly what I'd had in mind when I was planning our fancy meal! ;) We've decided not to host Thanksgiving this year--it's most likely the last time all my dad's girls will be in the country together (one of my sisters plans on moving to England with her boyfriend after her last year of school). But I digress. Back to the buffet.
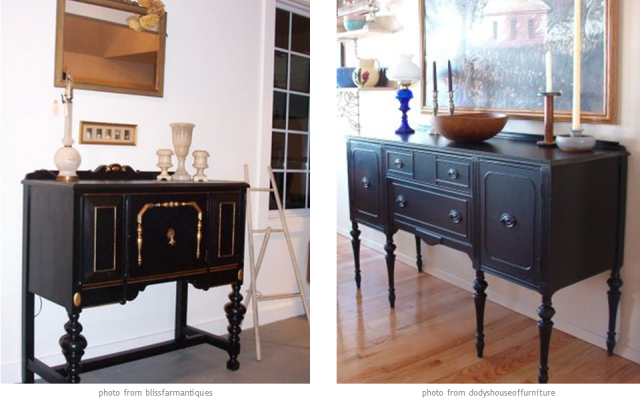
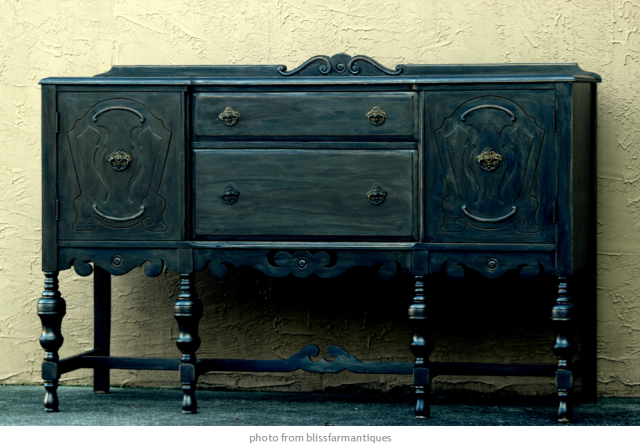
One of the great things about having a day job again is having money for larger projects. I'm not fooling myself--if I can find a buffet for $150 I will be very happy! I'd like something like one of these. Chunky legs and spindles, no boxy shapes like the ones you find in Target and Wal-Mart these days.
I plan on putting it on the same wall that our shelves hang on, but I don't want it to be too deep since that's right near our entryway.
Just by chance, I also happened to come across this photo on The Inspired Room (I'm hooked on the 31 Days series every one's doing), which is from House Beautiful. And I was immediately struck with inspiration!
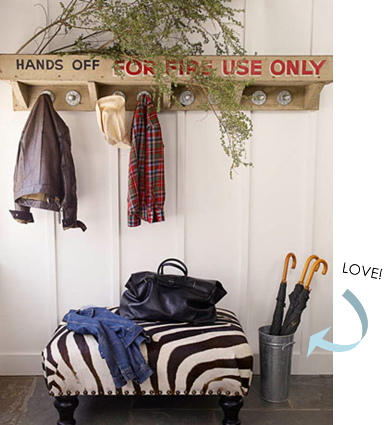
I have a bunch of these galvanized tin buckets froma cracked out obsessive shopping spree earlier this summer. I picked up two from Michael's, one of which is on our wall unit downstairs...

...and another which is serving as a toilet paper holder in the guest bathroom.
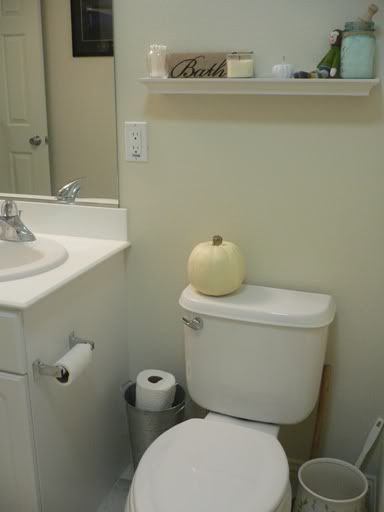
(sorry, there's no good way to photograph anything that sits next to the porcelain god.)
But I have one more, a larger one (right), that I picked up for only $5 at an antique warehouse (it was about the only thing I could afford in there and I was more than happy to take it off their overpriced hands).

I'm thinking that next to my hopefully-soon-to-be-acquired-buffet, filled with a few umbrellas, it will finally find its rightful place in our home! Now my only decision is black or white umbrellas. Against my white walls, black would definitely pop. But next to a black buffet would it be too much? Hmm...

One of the great things about having a day job again is having money for larger projects. I'm not fooling myself--if I can find a buffet for $150 I will be very happy! I'd like something like one of these. Chunky legs and spindles, no boxy shapes like the ones you find in Target and Wal-Mart these days.
I plan on putting it on the same wall that our shelves hang on, but I don't want it to be too deep since that's right near our entryway.
Just by chance, I also happened to come across this photo on The Inspired Room (I'm hooked on the 31 Days series every one's doing), which is from House Beautiful. And I was immediately struck with inspiration!
I have a bunch of these galvanized tin buckets from
...and another which is serving as a toilet paper holder in the guest bathroom.
(sorry, there's no good way to photograph anything that sits next to the porcelain god.)
But I have one more, a larger one (right), that I picked up for only $5 at an antique warehouse (it was about the only thing I could afford in there and I was more than happy to take it off their overpriced hands).
I'm thinking that next to my hopefully-soon-to-be-acquired-buffet, filled with a few umbrellas, it will finally find its rightful place in our home! Now my only decision is black or white umbrellas. Against my white walls, black would definitely pop. But next to a black buffet would it be too much? Hmm...
October 4, 2010
Jason's homecoming: the official outfits
Yes, you read that correctly, I did say outfits. First, lets start with the ones you chose.

"Ode to Joy" was my final pick! Both dresses are beautiful and very well made, but as you may (or may not) be able to tell, "Soda Fountain In Grape" (left) hung on my top half sort of awkwardly. It just made me look very boxy. So it was returned to the swell folks at ModCloth (who I am still not being paid or compensated to endorse).
But, after aaaalllll that: I just found out the other day that there's a high chance that the boys will be coming home in the evening! >>palm. forehead.<< As soon as Jason said "night time ETA," I had a flash back to August when I was still job hunting (and had an interview at Sephora). I wandered into Banana Republic because even thoughI couldn't afford anything I wasn't in a buying mood, I just always love being in their stores. Until I saw these: dark wash boot cut jeans.

My inner spender starting screaming, Let me out, let me out! But their $79.50 price tag made me stop and think: did I want new jeans? Or did I want to pay the Internet bill this month? Since at no point did my blog black out in August, I think you know what I chose. Back on the rack they went. {insert whimper and sniffle here}
Fast forward to yesterday. Now with the evening arrival of my husband, I asked my mom and if could swing by BR while we were out and about sinceI could finally afford those jeans I was in a very buying mood. Imagine my delight when they were marked down to $49.50! So, here's the new homecoming outfit.


(i know it's bad luck to open an umbrella indoors, but you have to appreciate how cute the whole thing is.)
Outfit Details
Jeans - Banana Republic
Top - Nordstroms
Boots - some random little shoe place in North Carolina
Trench - Target
Umbrella - Burberry (Smartbargains.com)
Gloves & scarf - Target
I'm telling you people, after standing around at three a.m. in the middle of March (and with the crazy freak weather we're having here), we are going prepared! Hot chocolate, Irish coffee, hot cider, blankets, pillows, board games--you'd think we were preparing for a natural disaster (or a really crazy and cold tailgate)! Today I plan to do my grocery shopping since I'm off (and order the tiramisu!) and start preparing for--what's looking to be--a slew of house guests in the days leading up to the arrival.
But everyone has been informed that when Jason arrives, they all get an eviction notice. Hehe...

- Grocery Shopping
-Have duvet dry cleaned
- Make chocolate covered strawberries
-Purchase mirror for bedroom
- Mop, sweep, & vacuum like crazy
- Paint other foot stool
-Find cold weather alternative for homecoming outfit
-Hit up Tuesday Morning & Dollar Tree for some cheap fall decor
(see my fall decorating bonanza parts one, two, and three here).
"Ode to Joy" was my final pick! Both dresses are beautiful and very well made, but as you may (or may not) be able to tell, "Soda Fountain In Grape" (left) hung on my top half sort of awkwardly. It just made me look very boxy. So it was returned to the swell folks at ModCloth (who I am still not being paid or compensated to endorse).
But, after aaaalllll that: I just found out the other day that there's a high chance that the boys will be coming home in the evening! >>palm. forehead.<< As soon as Jason said "night time ETA," I had a flash back to August when I was still job hunting (and had an interview at Sephora). I wandered into Banana Republic because even though
My inner spender starting screaming, Let me out, let me out! But their $79.50 price tag made me stop and think: did I want new jeans? Or did I want to pay the Internet bill this month? Since at no point did my blog black out in August, I think you know what I chose. Back on the rack they went. {insert whimper and sniffle here}
Fast forward to yesterday. Now with the evening arrival of my husband, I asked my mom and if could swing by BR while we were out and about since
(i know it's bad luck to open an umbrella indoors, but you have to appreciate how cute the whole thing is.)
Outfit Details
Jeans - Banana Republic
Top - Nordstroms
Boots - some random little shoe place in North Carolina
Trench - Target
Umbrella - Burberry (Smartbargains.com)
Gloves & scarf - Target
I'm telling you people, after standing around at three a.m. in the middle of March (and with the crazy freak weather we're having here), we are going prepared! Hot chocolate, Irish coffee, hot cider, blankets, pillows, board games--you'd think we were preparing for a natural disaster (or a really crazy and cold tailgate)! Today I plan to do my grocery shopping since I'm off (and order the tiramisu!) and start preparing for--what's looking to be--a slew of house guests in the days leading up to the arrival.
But everyone has been informed that when Jason arrives, they all get an eviction notice. Hehe...
- Grocery Shopping
-
- Make chocolate covered strawberries
-
- Mop, sweep, & vacuum like crazy
- Paint other foot stool
-
-
(see my fall decorating bonanza parts one, two, and three here).
September 30, 2010
Fall decorating part three: the master bedroom
Wreath I made with Dollar Tree supplies, $7 total.
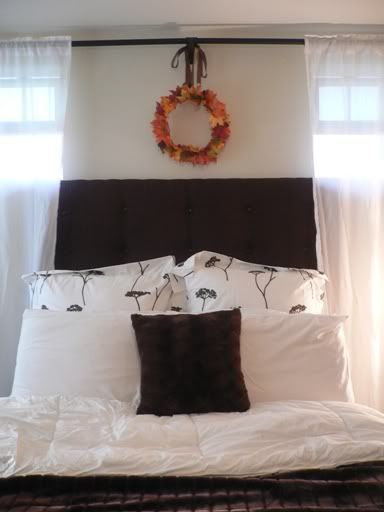
Mini-pumpkins from Tuesday Morning, $3 and $4. Switching out the wooden roses for leftover floral picks, $0.

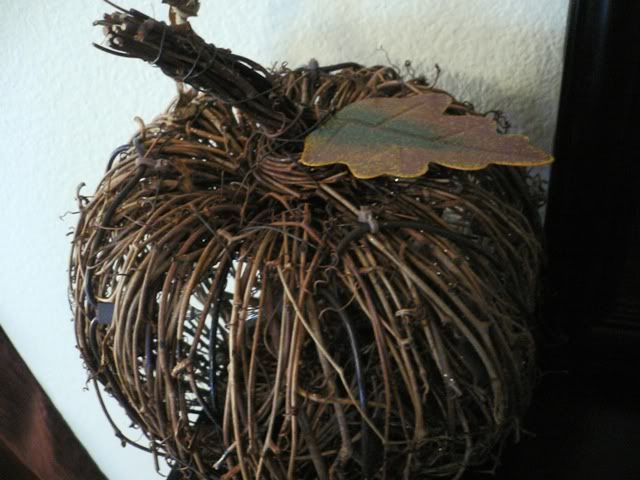
Grapevine pumpkin from Michael's, $14--way cuter, cheaper, and the same size as Pottery Barn's small grapevine pumpkin. I actually bought another small one and a large one with a 20% off coupon! And it does actually light up, but the cord is too short/my dresser is too tall for it to reach the outlet.
And this is probably about as far as I'll get with my fall decor before Jason gets back. But that's okay because in this house fall lasts all the way until Black Friday. ;)
I'm linking up to:
The Project Parade @ The DIY Show-Off
Mini-pumpkins from Tuesday Morning, $3 and $4. Switching out the wooden roses for leftover floral picks, $0.
Grapevine pumpkin from Michael's, $14--way cuter, cheaper, and the same size as Pottery Barn's small grapevine pumpkin. I actually bought another small one and a large one with a 20% off coupon! And it does actually light up, but the cord is too short/my dresser is too tall for it to reach the outlet.
And this is probably about as far as I'll get with my fall decor before Jason gets back. But that's okay because in this house fall lasts all the way until Black Friday. ;)
I'm linking up to:
The Project Parade @ The DIY Show-Off
September 28, 2010
10 Steps to a DIY Tufted Headboard
There's any number of tutorials out there for how to DIY your own headboard (and yes I realized it just said "do it yourself your own headboard"), but I'm going to throw mine into the mix anyways! I'm also going to let you in on the cost cutting tips I discovered while making ours! ;) Because of this, if you'd like to skip past my narratives, just look for the "»" and you'll know those are actual instructions.
SUPPLIES:
»Step one, decide how big you want your headboard to be.
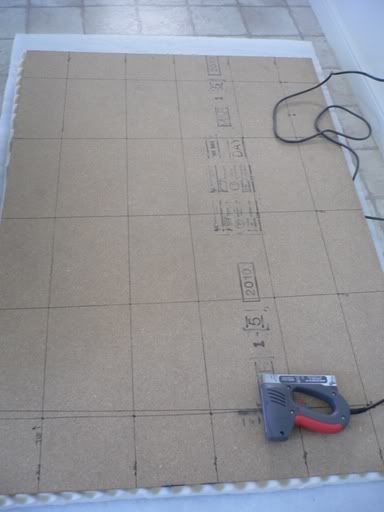
We have a queen sized bed, which is 60" wide. I knew I didn't want any sort of overhang, so the width of my headboard was going to be exactly 60". I also knew that I wanted something with some height and drama, so originally I chose to do an even 48" tall (or 4'). Unfortunately, after measuring my car's trunk, I had to pare it down to 42" tall. So my final base size was 60" x 42".
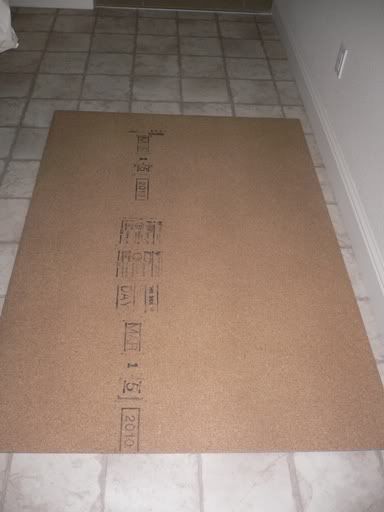
I used a 2" thick piece of plywood from Home Depot. Some people would rather work with MDF, but I was on a tight budget and I got a 4' x 8' piece of plywood for less than $20.
»Step two, decide how many buttons you want and how you want them placed.
I decided to have a 6" cushion space around my edges. So I started by marking 6" down, and 6" in. From there I made marks every 7" from the top of the headboard, just because it made everything nice and even. Going across I think I made them every 5". I ended up with a total of 25 marks, but I only used 3 rows. So essentially, I had 15 button holes.

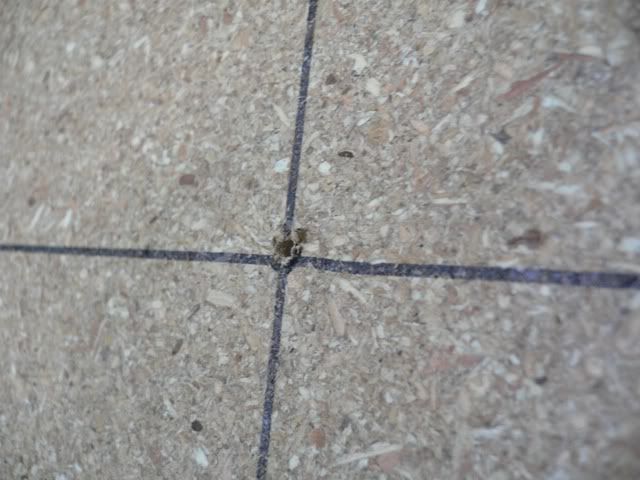
Step three, make a grid.
»Using a tape measure (and probably an extra set of hands if you need them--I did!), start drawing lines from each of your measurement hash marks. Wherever the lines cross, that's where a button goes.

You can see where I messed up on the final grid. Perfection is highly overrated.
»Step four, drill your button hole.
If it helps, you can draw a little bulls-eye dot on your overlapping lines. I found it a little easier so I knew exactly where to put my drill bit.

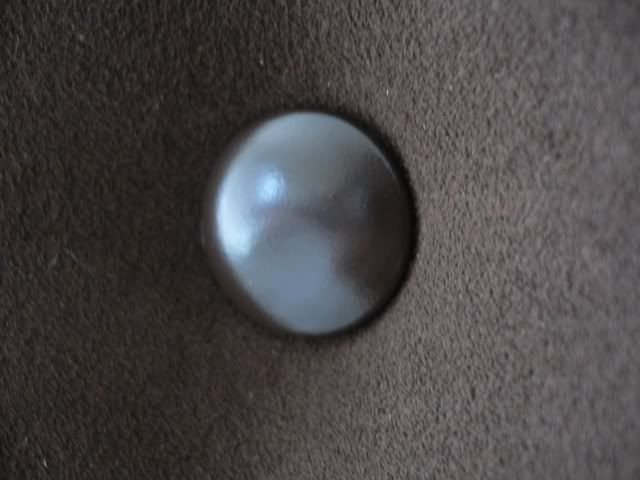
(By the way? My final holes ended up being muuuuch bigger.)
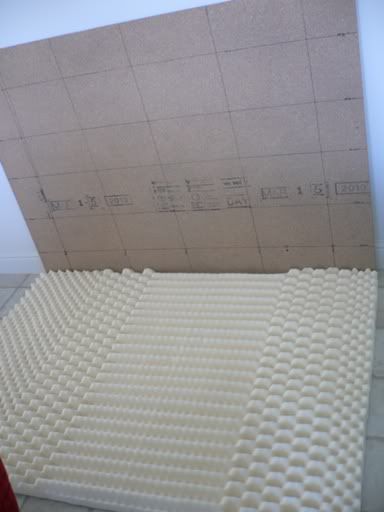
Step five, apply your foam and batting.
Here's where I started running into the big bucks budget-wise. Because of my odd(er) shape, I was going to have to buy 2 yards of foam to fit my 60" in length, but JoAnn's only sold it in 24" wide pieces. Which meant I now had to buy 4 yards. Their foam is priced at something like $24/yard for the two inch thick stuff (the minimum thickness I wanted to foam to be). Did you do that math? We're talking almost $100 for foam!
I went back to the drawing board and decided instead to use a foam mattress topper, or what we called in my grandma's day, an egg crate. A full-size 3" thick mattress topper on Overstock.com was only $50, and its dimensions were more than ample at 51" x 72." So that just saved me an additional $50!
»Once the foam was cut down to size, I flipped the actual egg crate side over so that the smooth side was facing (what would eventually be) the front of the headboard. I didn't use any sort of adhesive, I just laid everything down on top of one another. Apply batting using a staple gun. Trim any excess.
(see? egg crate side towards the plywood.)
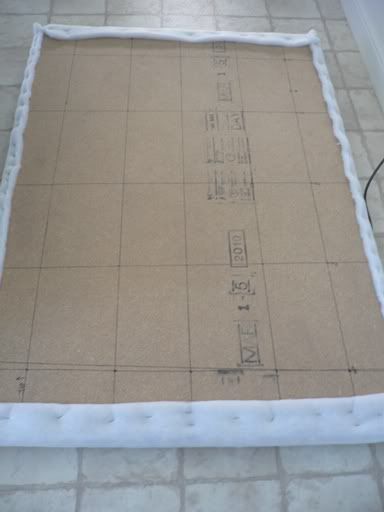
Step six, apply your fabric.
This is another area I ran into challenges budget-wise. In my head, my ideal headboard was an ultra rich suede fabric. This ran for about $35/yard at JoAnn's, and even with a 40% off coupon, I was still looking at almost $21/yard or $42 total for my fabric (not including shipping--my JoAnn's didn't carry it in-store). $40+ was not copacetic for me (or my budget).
Then I realized, Hey, window panels are typically 54" wide, and 80-something-inches long. And they only run around $20. My good friend Overstock.com beat out even Wal-Mart's prices, and I landed a great 56" x 84" chocolate colored suede panel for only $18. Cha-ching! That $24 saved just paid for my button kits!
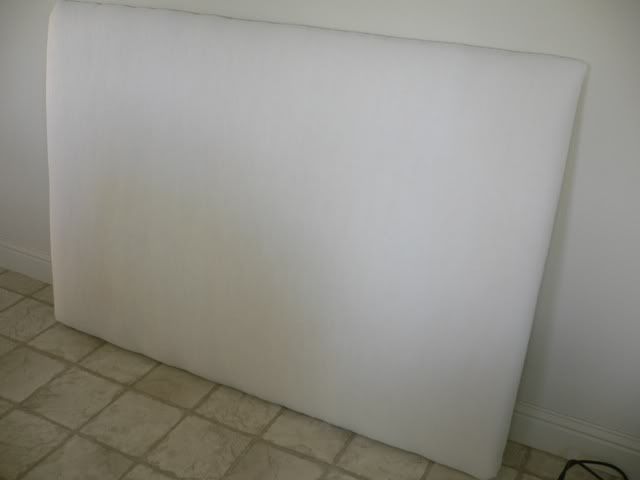
»Using the same method as you did when applying your batting, apply your fabric. If you're using a print, make sure it's centered and lined up right. Pull everything nice and tight. Trim any excess.
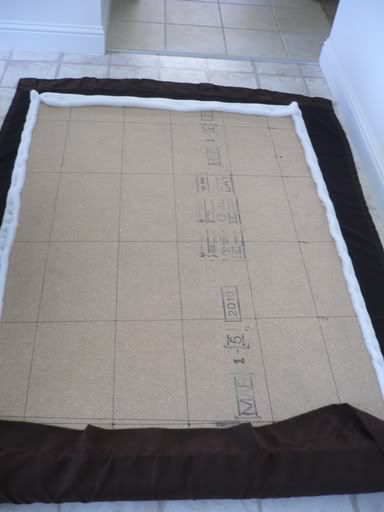
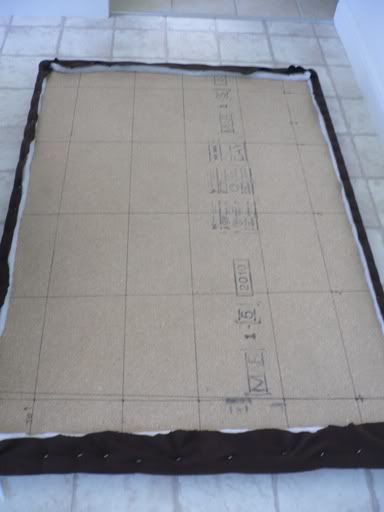
I pulled mine a little too tight and wound up with little ripples. Meh.
»Step six, deal with your buttons.
If you're using a button kit to cover them in fabric, this is where you do that. If you run into snags and want to throw the whole thing out the window like I did, read on...
I purchased button kits, with the inention of covering them with my (plenty of) leftover fabric from the curtain. For one, I went cheap when buying the kit, which made covering them in fabric difficult.
For two, when I was laying out my buttons, I realized I was short! They only came in packs of 3, and I thought I only needed 20. Guess who ended up being short 4 buttons? (Hint: ME!) So now, I didn't have enough buttons and after 20 minutes of trying I hadn't been able to cover a single one with fabric. >>palm. forehead.<<
I really didn't want to just hang a brown square above our bed (although I won't lie--it was totally an option after those couple of fails). I couldn't return the buttons because I had opened every. single. package., and I felt just rotten at the idea of wasting any sort of money.
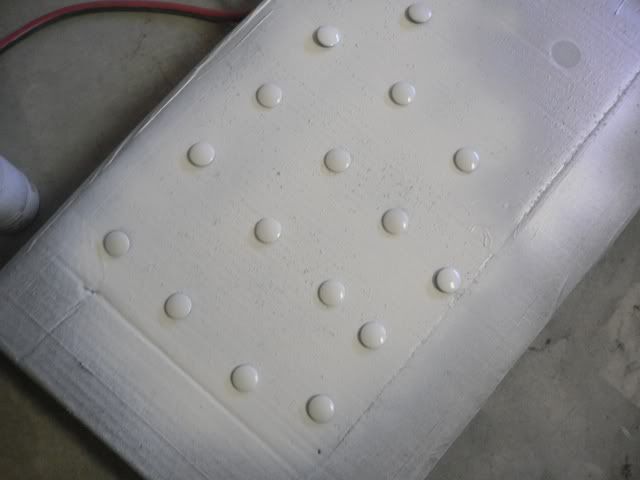
But then, the light bulb went off. I thought, Has anyone ever painted their buttons? Why not? I had plenty of brown/oil rubbed bronze/espresso spray paint! And what did I have to lose?
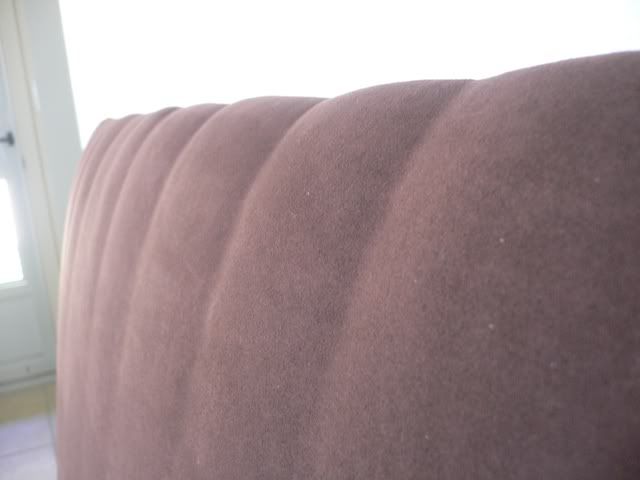
Step seven, start tufting!
I used a 20-gauge wire since my layers were so thick. Believe me when I say floss and embroidery thread do not work! They snap like twigs. I already had wire cutters on hand, and the wire ran for $3 at Michael's in the jewelry making section.
Using a large needle, loop the wire through and pinch to secure.
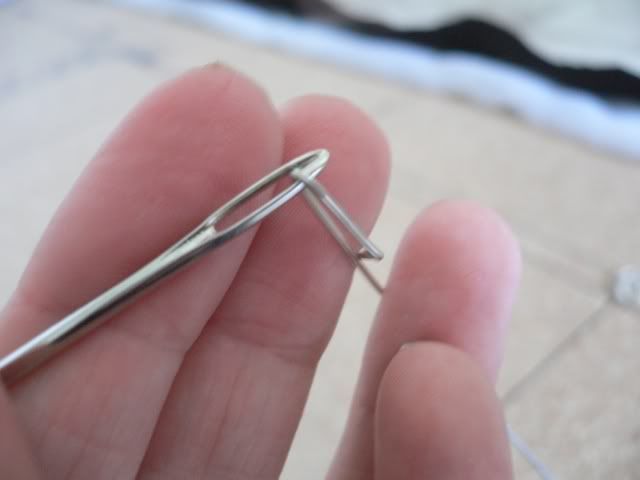
Push through the back of the headboard (towards the front), loop needle and wire through the back of the button, and thread back through the hole (sorry, didn't get a pic of this part).
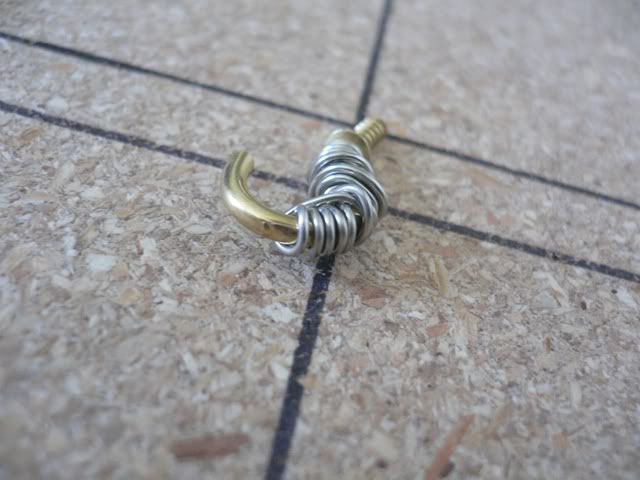
To secure the button, I pushed on it with my knee to get a tight tuft, and used a "?" hook to wrap the wire around. I used pliers to make sure everything was wrapped as tight as it could be.
Repeat until it feels like your fingers are going to fall off and you're sweating like a farm animal!
»Step eight, mount your hanging hardware.
A French-cleat hanging system is said to be one of the best ways to hang heavy objects. If you don't happen to own a fancy cutting machine to make your own, Home Depot sells them in their hardware department with their picture hanging supplies. OOK is the brand name, and they run about $10 for a system that holds 100 pounds (which is what I got--this thing is hanging above our sleeping heads after all!).
Just make sure you center everything so your bed and headboard pair together like two peas in a pod (or two nuts in a shell--hehe!).
»Step nine, hang your head board.
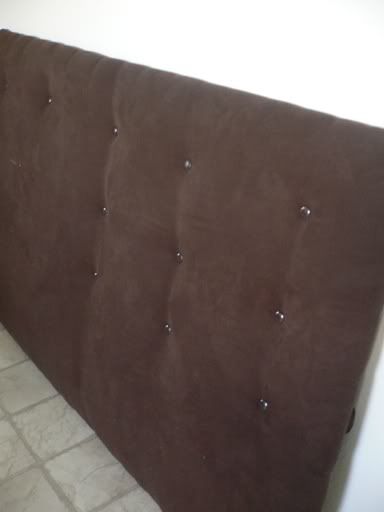
(okay, so my rows aren't perfect! as I said before, perfection is highly overrated!)
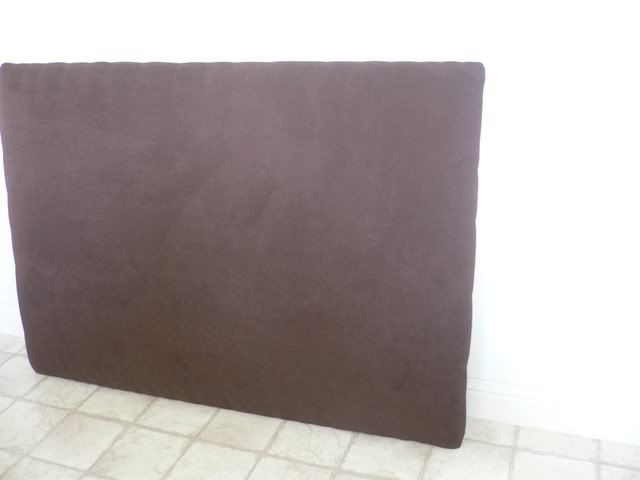
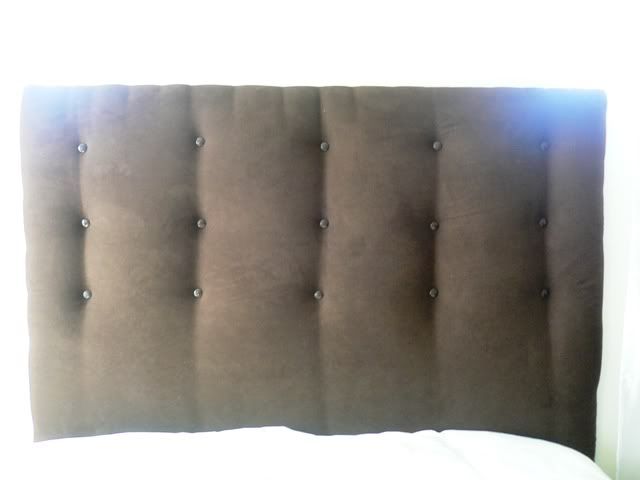
»Step ten, admire, swoon, and take lots of pictures.

You can see now why I wasn't worried about only doing three rows of buttons: the bottom two rows would have been covered by our pillows anyways!
And there you have it! 10 steps to a DIY tufted headboard!
BREAKDOWN:
GRAND TOTAL: $127
I actually only paid $99 for our headboard, because the plywood and hanging hardware were purchased with a gift card I got for my birthday! Now that's what I call budget friendly! Yes, for $127 you can buy pre-made headboards from Wal-Mart, Target, and even places like Costco. But for this price you can't beat a headboard that towers over your bed at nearly four feet tall! And people are a lot more impressed when you say "Oh that little thing? That was just something I did one weekend when I was bored!" ;)
September 24, 2010
The master bedroom "reveal"
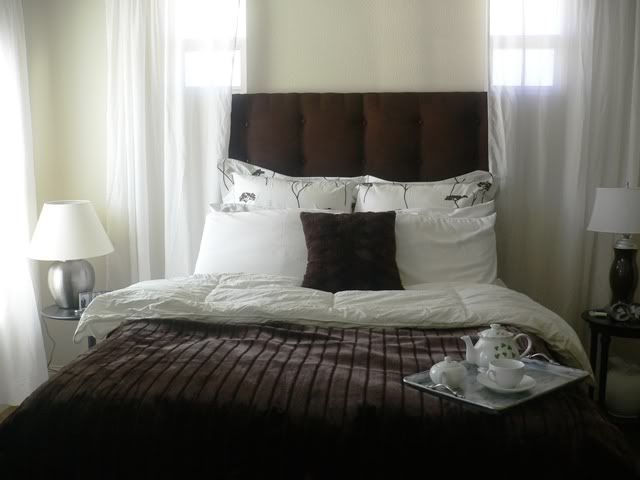
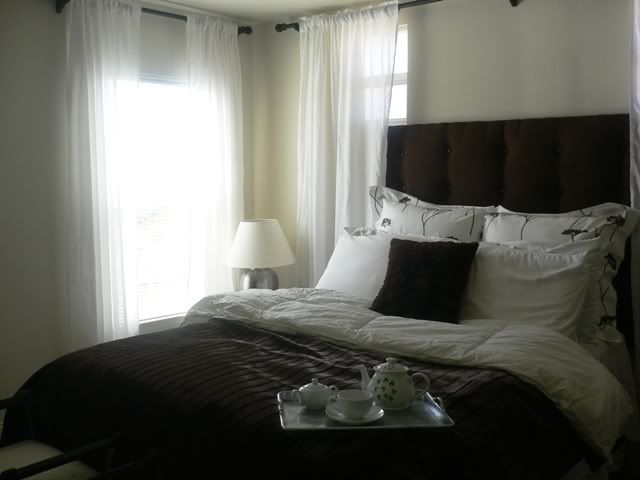
Since it's not technically done, there will be more photos down to road--not to mention I still have to show you what I end up doing with the master bathroom, but that's definitely still a ways off. Please disregard my wrinkled duvet--I'm still planning to have it dry cleaned and hopefully it'll be nice and magazine-worthy-smooth once it's done. Let's just have a few refresher photos, shall we?
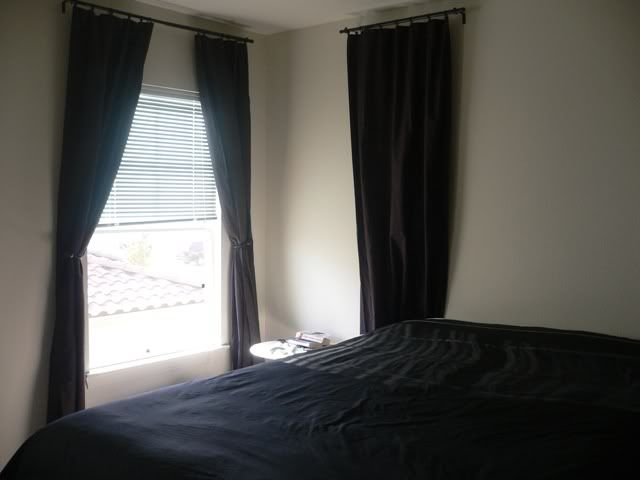
The very before, in 29 Palms. So. Sad.

The "update" it got when we moved to the new house.
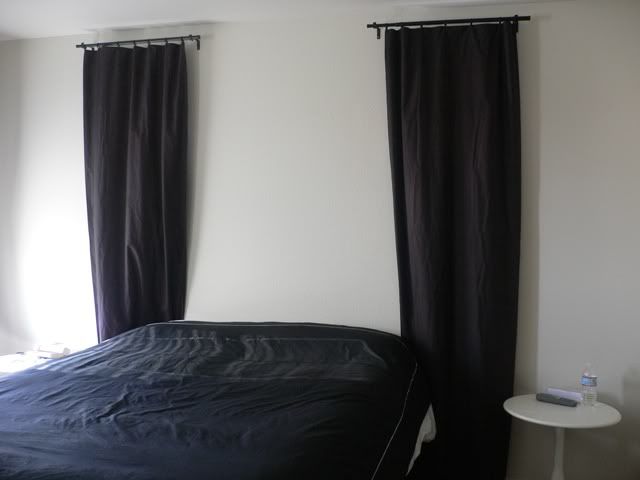
And after. I splurged on the faux fur blanket, which was $150 at Nordstrom. Mom and I had seen it one day and I was instantly enamoured by it. A week later I went back to return a purse and bought it! It was worth every penny as I feel it gives the room a very decadent, sumptuous feeling to it. The silver tray I made out of an old cookie sheet. You can check out that project here.
I wanted our room to feel romantic, modern, but with a hint of vintage/eclectic to it as well, and I think I accomplished it!
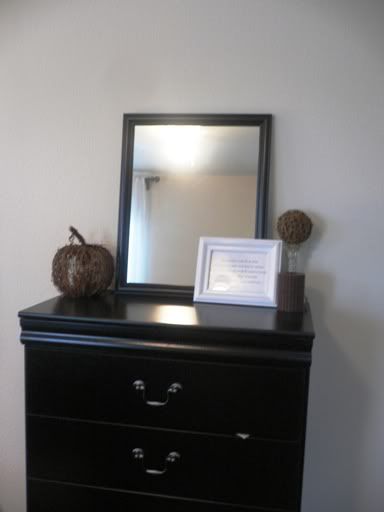
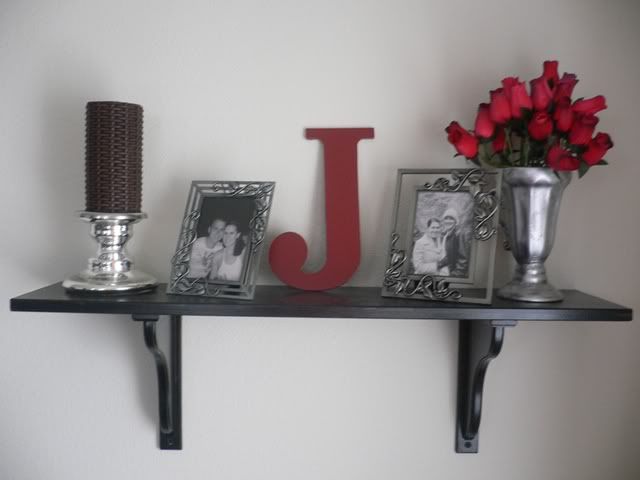
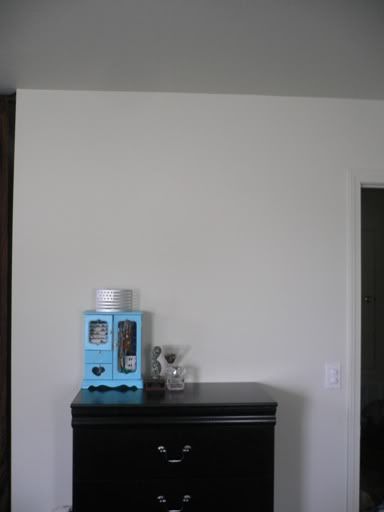
You may remember what the main wall looked liked before. It definitely needed something since it's directly across from our (now amazing) bed, and the room would have felt off if this wall was left empty.

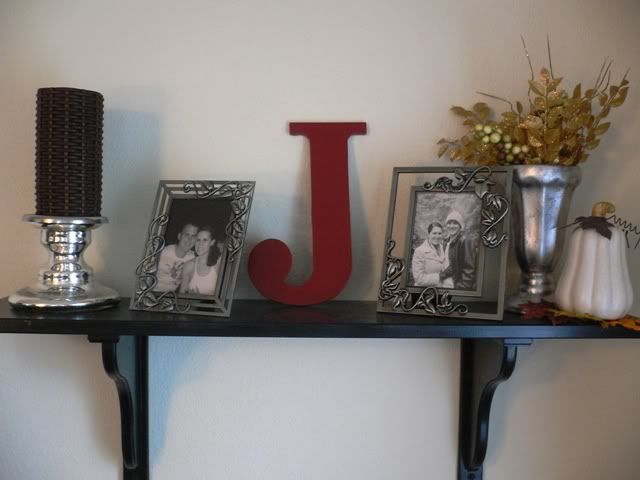
The shelves and brackets I picked up from IKEA and painted really help to fill up all the blank space. They were decorated using mostly home shopped and freebies, with a few store-bought items (post make-over). And I do still plan to make a runner for this dresser. But I might wait and see if we get a new TV first...

(hello reflection!)

This little dresser needed some sort of pick-me-up as well. My readers suggested leaning a mirror against the wall to make it look more like a set, and I really liked the idea! I picked up cheap-o plastic framed mirror from Wal-Mart for a whopping $18, gave it a coat of satin black paint (I didn't want it to be super glossy since the dresser isn't either).
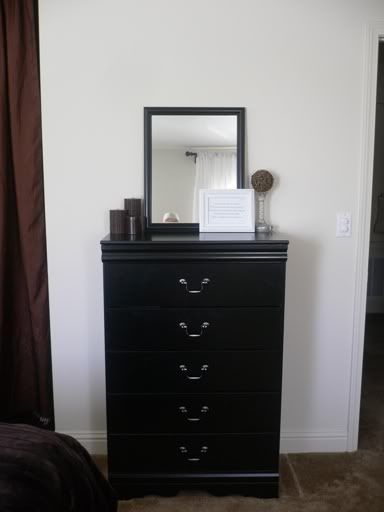
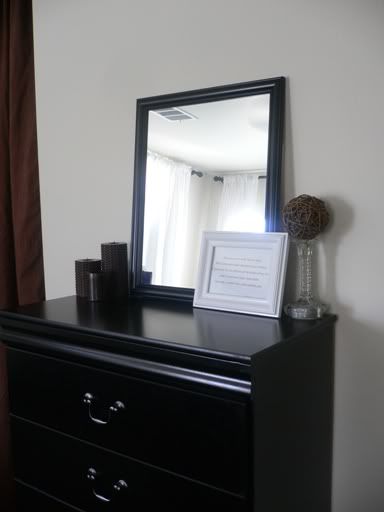
I added some more of my $3 Michael's candles, along with a plain one too to mix up the textures.
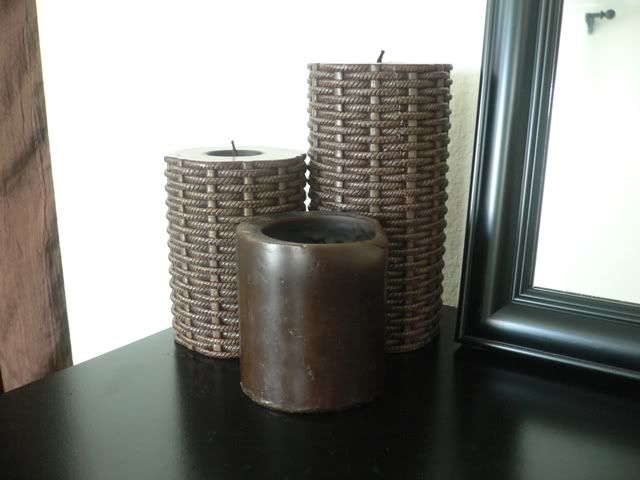
Another on of my thrift store candle sticks, and a twig ball that was originally downstairs in my spring/summer decor. The picture frame was black, but I thought white would pop better since the mirror and dresser are both black. It may become apple green in the future.
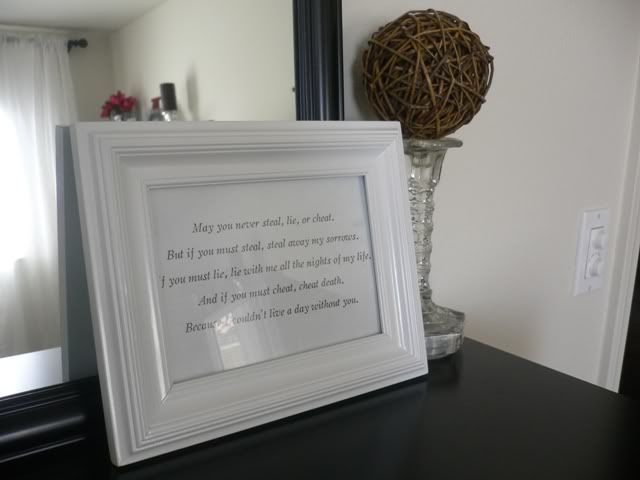
The saying inside is from "Leap Year" (c'mon, you knew I'd get an Irish element in there somewhere). When I heard it, it made me bawl and I knew I had to have it in our bedroom. It says:
"May you never steal, lie, or cheat.
But if you must steal, steal away my sorrows.
If you must lie, lie with me all the nights of my life.
And if you must cheat, cheat death.
Because I couldn't live a day without you."
And now for the part that everyone is always the most curious about: the price tag. Just remember, this isn't actually complete since I haven't taken the foot stools to an unholsterer yet and that will probably tack on a few bucks.
BUDGET
- Bed/headboard (DIY) - $99 (I'll be posting a tutorial on this in the next few days!)
- Window Treatments - $58
a. Hardware (Home Depot) - $0 (purchased with gift card)
b. Curtains (IKEA) - $48
c. Blackout curtains (already owned fabric) - $0
d. Velcro (Joann's) - $10
- Paint (Home Depot) - $0 (purchased with gift card)
- Bedding - $238
a. Faux-fur blanket (Nordstrom) - $150
b. Euro shams (One Kings Lane) - $34
c. White pillow cases (4, Wal-Mart) - $22
d. Pillow inserts (eBay) - $32
- Décor/Misc. - $118
a. Amber’s lamp (from Mom) - $0
b. Amber’s side table (reused from other room) - $0
c. Jason’s lamp (IKEA) - $60
d. Jason’s night stand (already owned) - $0
e. Shelves (IKEA) - $16
f. Brackets (IKEA) - $10
g. Candles (Michael's) - $6
h. Pottery (World Market) - $16
i. Picture frames (from Grandma) - $0
j. Mirror (Wal-Mart) - $10
Running Total: $513
I'm amazed at how much more sophisticated it looks! And for less than $600? Hoo-ray. Yes, this took some time, but it was worth it. I've found that taking my time and finding things that make the bedroom juuuuust right is more satisfying than buying stuff all at once and then donating most of it to Goodwill once something better comes along.
I'm linking up to:
The Project Parade @ The DIY Show-Off
The very before, in 29 Palms. So. Sad.
The "update" it got when we moved to the new house.
And after. I splurged on the faux fur blanket, which was $150 at Nordstrom. Mom and I had seen it one day and I was instantly enamoured by it. A week later I went back to return a purse and bought it! It was worth every penny as I feel it gives the room a very decadent, sumptuous feeling to it. The silver tray I made out of an old cookie sheet. You can check out that project here.
I wanted our room to feel romantic, modern, but with a hint of vintage/eclectic to it as well, and I think I accomplished it!
You may remember what the main wall looked liked before. It definitely needed something since it's directly across from our (now amazing) bed, and the room would have felt off if this wall was left empty.
The shelves and brackets I picked up from IKEA and painted really help to fill up all the blank space. They were decorated using mostly home shopped and freebies, with a few store-bought items (post make-over). And I do still plan to make a runner for this dresser. But I might wait and see if we get a new TV first...
(hello reflection!)
This little dresser needed some sort of pick-me-up as well. My readers suggested leaning a mirror against the wall to make it look more like a set, and I really liked the idea! I picked up cheap-o plastic framed mirror from Wal-Mart for a whopping $18, gave it a coat of satin black paint (I didn't want it to be super glossy since the dresser isn't either).
I added some more of my $3 Michael's candles, along with a plain one too to mix up the textures.
Another on of my thrift store candle sticks, and a twig ball that was originally downstairs in my spring/summer decor. The picture frame was black, but I thought white would pop better since the mirror and dresser are both black. It may become apple green in the future.
The saying inside is from "Leap Year" (c'mon, you knew I'd get an Irish element in there somewhere). When I heard it, it made me bawl and I knew I had to have it in our bedroom. It says:
But if you must steal, steal away my sorrows.
If you must lie, lie with me all the nights of my life.
And if you must cheat, cheat death.
Because I couldn't live a day without you."
And now for the part that everyone is always the most curious about: the price tag. Just remember, this isn't actually complete since I haven't taken the foot stools to an unholsterer yet and that will probably tack on a few bucks.
BUDGET
- Bed/headboard (DIY) - $99 (I'll be posting a tutorial on this in the next few days!)
- Window Treatments - $58
a. Hardware (Home Depot) - $0 (purchased with gift card)
b. Curtains (IKEA) - $48
c. Blackout curtains (already owned fabric) - $0
d. Velcro (Joann's) - $10
- Paint (Home Depot) - $0 (purchased with gift card)
- Bedding - $238
a. Faux-fur blanket (Nordstrom) - $150
b. Euro shams (One Kings Lane) - $34
c. White pillow cases (4, Wal-Mart) - $22
d. Pillow inserts (eBay) - $32
- Décor/Misc. - $118
a. Amber’s lamp (from Mom) - $0
b. Amber’s side table (reused from other room) - $0
c. Jason’s lamp (IKEA) - $60
d. Jason’s night stand (already owned) - $0
e. Shelves (IKEA) - $16
f. Brackets (IKEA) - $10
g. Candles (Michael's) - $6
h. Pottery (World Market) - $16
i. Picture frames (from Grandma) - $0
j. Mirror (Wal-Mart) - $10
Running Total: $513
I'm amazed at how much more sophisticated it looks! And for less than $600? Hoo-ray. Yes, this took some time, but it was worth it. I've found that taking my time and finding things that make the bedroom juuuuust right is more satisfying than buying stuff all at once and then donating most of it to Goodwill once something better comes along.
I'm linking up to:
The Project Parade @ The DIY Show-Off
Subscribe to:
Posts (Atom)
