April 30, 2010

Honey-Do Friday, episode 7: Recap

Wow! What a week it's been! I just realized that I posted nearly every day! I like weeks like this--they make the deployment go faster (cannot even begin to describe how happy I am that tomorrow is May). Before we all jump into our weekends, I want to do a quick recap in case you may have missed anything this week!


First we had a special visitor in my first ever blog swap. Sophia from PinkieLarue guest posts about her road trip all over the North East and Canada! Check it out in Tuesday's post.


I completed Project: Copycat, coming in $45 under my inspirational piece. It's now hanging out in my soon-to-be-finished guest room. See how I did it in Wednesday's post.


Kylie dropped me a letter asking about how I got started decorating, how I found my style, and some tips and pointers on how she could get started in her own home. See the novel I responded with in Thursday's post.


- Tidy up for house guest (my friend Katie)

- Katie's birthday dinner

- Paint picture frames for master bedroom (more on these Monday)

- Print photos (also for master bedroom)

- Paint curtain rods and brackets

- Hang curtains

- Return item to Overstock.com

- Return "wrong" curtain to JC Penney

- Purchase new pillow cases at Target

- Hit ESW for side table lamp

It's going to be a busy weekend. Busy is good though! The busier I stay, the faster time goes, and the sooner Jason will be home. Before I jet off though, here's an ode to the final day of April.

"Here the first daisies break free from the sod,
Stars looking up with their first glance to God!
Here, ere the first days of April are done,
Stand the swart cherry trees robed with the sun;
In the deep woodland the windflowers blow;
Where young grass is springing, the crocuses glow,
Down the green glen is the primrose's light,
Soft shines the hawthorn's raiment of white;
Round the rough knees of the crabtree a ring
Of daffodils dance for joy of the spring..."
~ Rose Kavanagh

April 29, 2010

Letters from readers


Dear Kylie,

I honestly think I was bitten by the DIY-bug right after Jason and I were married. We were getting ready to be shipped off to our first duty station as a couple and my mom's neighbor (who happened to be the wife of a retired Marine Corps Sergeant Major) said these words to me:

"You'll come to realize as a Marine wife that when it comes to redecorating, spray paint is your best friend."

I didn't know what she meant at the time, but I certainly do now! As most everyone knows the military is not the highest paying field out there. Our lives are usually lived paycheck to paycheck and if you want nice things you have to work to get them. Whether that means saving up the money or hunting down that phenomenal bargain. I choose the latter.

I find that when it comes to redecorating, sometimes the magazines have it wrong. You don't have to paint walls. White can be the perfect starting point. I started by using the most basic colors in our house. Namely, black and white. White walls and fabrics with black wood/frames/metals. Once I started to get most of our furniture nailed down, then I set to work on the other colors.

I find my inspiration from places like IKEA, Ballard Designs, and mostly (as you may be able to tell from the blog) Pottery Barn. Are they the most original of sources? No. But do I love them? YES. And I want to be surrounded by a style that I love. That's how I know I won't get sick of it. I try not to follow major trends (although I'm guilty of following a few--galvanized tin is my weakness right now).


So that would be my first and foremost piece of advice: find a style you love. Other blogs are a great resource for this, as well as decorating magazines. Spend an hour at your local bookstore in their magazine section and you'll probably find yourself drawn to certain styles right away. Have a notepad handy and start writing down what catches your eye. Is it the colors? Is it the furniture? Is it the lack of knickknacks or the abundance of knickknacks?

Once you find something you like, you can either cut out the pictures (after buying the magazine of course) or find their digital counterparts online. If you see something you want, circle it and start trying to find it, or its doppelganger. You'd be surprised how many great pieces your local Goodwill has for mere pennies on the dollar! And it's (usually) very good quality furniture.

Never be dissuaded by the color of a piece. Wood stains, paint strippers, and paint are all extremely easy to use. You want to look for solidarity in a piece (is it going to break if you set a vase on it?) and the shape of the piece (is it a close shape to your inspiration piece?). Traci @ Beneath My Heart did a great post on a bargain she found for her master bedroom makeover that shows what I mean.

My most honest piece of advice would be this: don't kid yourself on what you're capable of. For our office makeover, I reupholstered a cane-back chair that I thought would be the death of me. It was an experience, but I'll never do it again. I'll buy the fabric I want and make room in my budget for a pro-upholsterer.


Sooooo...after aaallllll that, the best thing I can tell you is this: imitation is the sincerest form of flattery. Don't be afraid to find something you love and copy it. Just make sure you add a little of yourself and your style in there as well. That's what makes it you. That's what makes your house a home.

I really hoped this has helped you and please don't be afraid to write back and ask more questions. That is, if you're not terrified of the novel I just wrote you! :)

Take care and thank you for your sweet, sweet comments. You've made my week!

Love in bloggerdom,
Amber

April 28, 2010

Nice rack


I'm loving my newest accessory for the guest bedroom! I really don't know what to call it. It's not a coat rack, but simply calling it a rack sounds so much like my husband and his Marines on a Friday night wrong as well. So if anyone can come up with a good name, I'm all ears!

Before I get into the tutorial, I'd like to take a moment and give a shout-out to eBay seller Texas Home Decor, which is where I bought my hooks from. They were an amazing price--at about $3.50 a piece with shipping included, you can't even find plastic look-a-likes at Target for that price, and these are actual cast iron. But the cherry on top was that after ordering them on Friday afternoon they were already in my (California) mailbox by Monday! You better believe that at 11:30 Monday night I was running to my mailbox after checking the tracking info and seeing that DELIVERED message. (Yes, I checked my mail at 11:30 at night. Jason and I have always been bad about checking our mailbox everyday and it's not uncommon for our mail to pile up for three or four days before we retrieve it.)

Okay, moving on...first things first I measured my wall and used my inspiration as a guide for the size. I chose to do 27" x 5". I used a piece of my $0.51 plywood that I had planned on using on the wall unit--just so happened, it was 27" in length exactly! But as you can see, my jigsaw skills still aren't the greatest. They're getting better though! Since I'm going for the whole imperfect-reclaimed-wood-look I figured it just adds character! ;)


I'm pleasantly surprised at the knot holes this plywood has in it.


Next I used some of my favorite Minwax stain in "Dark Walnut." I originally purchased a little container of it to makeover my JoAnn tray and it's still got a lot of life in it. SIDE NOTE: If you happen to see Minwax stain at Michaels, do not buy it! It's so overpriced. Our Michaels sells it for about $9, but Home Depot only charges $4 or $5.


I only used one coat and didn't stress about getting it into the knot holes perfectly. Once it was dry, I used a sample pint of Behr's Artist Canvas in flat. For all you Rust-Oleum Heirloom White lovers, Artist Canvas is a very close match for a roll-on paint (if your Home Depot is like mine and doesn't carry Heirloom White in anything but a spray paint). I applied the paint in a dry brush style using both a foam brush and a regular paint brush (I cannot even begin to describe how panicked I was when I accidentally flicked paint onto the car of one of Jason's Marines--we're storing it for him while they're overseas).


Then I attached a single strip of plywood to the back to give the screws something to go into. I used short screws to begin with, but I wanted to try and prevent any chance of the screw tips scratching up our rented walls.


I hung it using d-rings and Velcro! ;) I'd like to try and find something a little better because it tips just ever so slightly away from the wall. But for now this system is working just fine!


(The hooks didn't come with hardware. So I just took some regular silver screws and used my rusting kit on them to make them match!)


The little hanging jar is actually made from a leftover Smucker's Strawberry preserves jar. I just jimmied a twine hanging system for it and it worked out perfectly (I even tested the strength by filling the jar with water). The faux-daffodils won't stay there for long. I plan on getting some fresh daisies at the farmer's market this week. I'm still on the hunt for the perfect basket like my inspiration photo, but my pink scarf looks kind of cute there too (and is still appropriate since we're having some unseasonably cold weather right now).

The total cost was $15.25 if you include the $0.51 for the plywood. I had everything else on hand. I loved my inspiration, but at almost $60 it was way out of my budget. My little knock-off was a whopping $45 less! GO BUDGET!

I'm linking up to:
Trash to Treasure Tuesday @ Reinvented
DIY Day @ A Soft Place to Land
Power of Paint Party @ Domestically Speaking
Transformation Thursday @ The Shabby Chic Cottage
Hooking Up With HOH @ House of Hepworths
Best DIY Projects of April @ Beneath My Heart

April 27, 2010

Guest post by Sophia @ PinkieLarue

I am so excited, because for the first time ever, I have a guest blogger! Go me and my tiny little blog! Whoo-hoo!! I met Sophia through our mutual networking site, 20 Something Bloggers and we did a blog swap. Sophia does a lot of traveling and since that's something you won't be seeing anytime soon here at The Nutshell (unless you want to hear about Jason's bargains in the desert market places), I thought a travel post would be a welcome distraction from my usual rounds of DIY.

I had the chance to throw some very random questions her way (who likes only typical interview questions?) and I was loving that she happily played along with my inane line of reasoning.

What made you start blogging?
I've always written in some way or another. I have about 30 hand written journals and diaries from age 8 to present! So blogging just came naturally. I started in 2001 on livejournal and haven't stopped since!

What did you want to be when you grew up?
I wanted to be an alligator, but since that dream was crushed in 1st grade (darn you, Mrs. Mitchell), I decided I wanted to be a veterinarian. Oh how things have changed! I'm currently studying to be a nurse.

What's one thing you wish people did better?
I wish people would clean/pick up behind themselves. I am constantly disgusted with the way people treat the environment. I hate seeing someone throw a wrapper out of their car on a highway or dump trash at the end of a street.

If you could gorge yourself at any restaurant or on any food, where/what would it be?
Huey's Cheese Fries! Huey's is a chain in Memphis, TN with the best burgers and amaaazing cheese fries topped with bacon bits, chives, and a side of sour cream. So bad for you, but delicious.

What's something people would be surprised to know about you?
People may be surprised to know that I was a model from age 16 to a couple of years ago. Nothing professional (I wasn't in vogue or anything :P), but I've been in tons of runway shows, commercial modeling for brochures, promotional events, photo shoots and I've even had a photo spread in a national magazine (Boycrazy! some teen magazine about hot boys. My pic was attached to an article about staying friends with your ex).

So, without further ado, please welcome Sophia from PinkieLarue!


You are probably expecting a post from the lovely Amber, but you get me. Sophia, also known as Pinkie Larue. It's a nickname turned internet alias that I use all over the place. I'm a geeky, 27 year old and after living all over the place (The Netherlands, Texas, Tennessee, and a teeny stint in Jersey) I am now in West Virginia with my boyfriend who I met in World of Warcraft (told you I was geeky!). I start nursing school full time in the fall, play roller derby, and I'm a mac. You can find me over at my blog, 
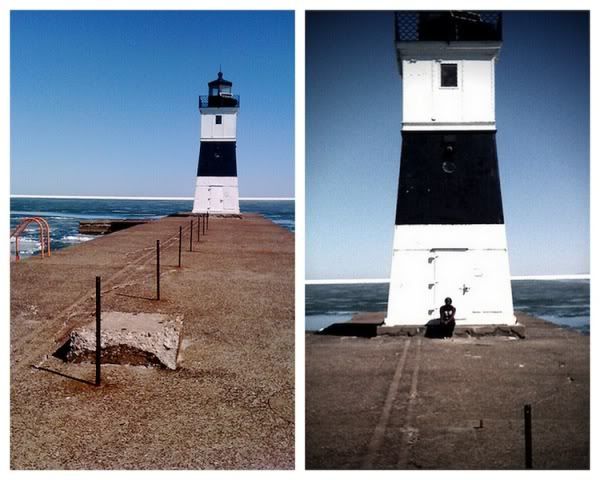
PinkieLarue where I blog about geeky things and whatever's going on in my life. Now that you sort of know me, on with the post! It's about a recent road trip with my boyfriend. The plan was to visit Toronto,Canada, but we made pit stops in Niagara Falls, Buffalo, New York, and Lake Eerie...what?! I wanted to see a lighthouse! Here's what went down:


Day 1-our town, West Virginia to Buffalo, New York This part of the trip was only supposed to take 4 and a half hours, BUT in Pennsylvania I saw a sign pointing to the direction of Lake Eerie and lighthouses. As I had never seen a lighthouse and it was still pretty early in the day and not out of the way, we stopped at a beach/park on Lake Eerie. :D We spent an hour walking and driving around the area. I got to see my lighthouse! And a couple of other beautiful sites. Random pit stops are the best!


After the pit stop we drove the last hour and a half to Buffalo. We arrived and had buffalo wings for dinner. When in Rome! We went to the Anchor Bar which is the home of the original buffalo wing. The place they were invented. They were yummy, but I've had better. I got extra hot and the bf got BBQ. He's a baby when it comes to hot stuff where as, I am an West African girl who was raised eating the spiciest foods! It was nothing for me. *brushes shoulder off*


After dinner we rested for a bit before driving 30 minutes to Niagara Falls to see the falls at night. We got there and I could barely see anything because of all the mist and hellooo?! It was dark. I was kind of disappointed and after walking around for 15 minutes I said "SCREW IT! Let's go back to the car". We were walking back when *click*, someone turned on the lights! All of a sudden the falls were lit up with green lights in honor of St. Patrick's Day. It was beautiful. I turned my grumpy frown upside down and enjoyed the lovely view! Wouldn't it have been a pity if I had missed out on that? Day 2- Niagara Falls to Toronto, Canada! The next day we woke up and had a big breakfast before heading out to see Niagara Falls during the day. The plan was to see it from the American side, the Canadian side, and then on to Toronto! The view of the falls from America's side were kind of crappy (comparatively). Due to ice, there were lots of barricades and because you're next to the falls, as opposed to across from them like you are on the Canadian side, the view is kind of obstructed.


The Canadian view was amazing. You could get a lot closer to the falls, so we spent quite awhile sitting there enjoying it. The sound of the water falling was so loud, but soothing. I joked to the boyfriend that I should record it to fall asleep to. (I sometimes fall asleep to recorded nature sounds)


After a few hours at the falls it was on to Toronto! Unfortunately, we had a little setback at the border patrol. We were one of the lucky cars that got picked to get searched. Yay! :/ They searched the car COMPLETELY! I mean, the door panels, everywhere in the trunk, under the seats-it was very thorough! They especially got curious over the baked goods we had in our car. Jennifer, whom we stayed with in Buffalo, gave us homemade cookies and brownies for the trip. The patrol guy actually opened and sniffed every Ziploc and questioned us if the brownie marked "w" was for weed.


We assured him it was for walnuts as he sniffed it! Haha, after the search we got our stamps and continued to Toronto!


Days 3, 4, 5-Toronto, Canada! Toronto is SUCH an artsy/hip city. Also very international and diverse. Foreign people make up 50% of the city. And you could definitely tell since there were "ethnic" neighborhoods called like Little Italy, Corso Italia, Greektown, Portugal Village, Koreatown, Little India, Little Jamaica, and my favorite Chinatown. I love shopping/eating in Chinatown's. Up until Toronto, NYC's Chinatown was my favorite. But not anymore! Toronto's Chinatown is HUGE! It's the second largest in North America. It spans for streets and streets and has tons of shops/bubble tea places and even malls! We spent an entire afternoon there-exploring, having lunch, and shopping.


Most of our time in Toronto was spent walking around exploring and eating yummy food! But we also did some touristy stuff. We took a walking tour and went to the CN Tower-the second tallest in the world. (It's one of the seven modern wonders of the world, which means I got to see 2 wonders on this trip!) We took the all inclusive tour, which was expensive, but definitely worth it. The tour takes you up the tower, in a glass elevator. I'm not usually afraid of heights, but I was definitely a little uneasy in this swaying, glass elevator, going 1500ft above Toronto! Once we stopped on the first level (1200ft) I was ok. The view from up there was amazing! On this floor there is a glass floor. Yup. A glass floor 1200ft above the ground! Of course I was scared, but I walked on it and to avoid ridicule by me for the rest of our lives, the boyfriend did it too. It was such a crazy feeling looking down. The people and cars looked like ants!


After hanging around on that floor for awhile, we took the elevator up to the highest point, 1500ft above Toronto.


The rest of the weekend was spent exploring the city and then celebrating my birthday with a cupcake, a nice dinner, and some beers! All in all a great little vacation and birthday.


I enjoyed sharing my trip with you and I hope you enjoyed reading. Thanks for having me, Amber!


I hope you stop by Sophia's blog and say hey! I loved having her here and reading about her trip. Sometimes living vicariously through someone is the perfect little "getaway" you need from your own life! ;)

April 24, 2010

Project copycat

I hate to admit what a little copier I am when it comes to some of my projects. But, then again, how many of us make Ballard Designs and Pottery Barn knock-offs? I guess it makes me feel a little more guilty when I borrow my ideas from etsy sellers though, since they're kind of "the little guys." But then again, I guess I could call us with our military budget "the little-er guys!" So here's my idea for my next DIY project.


I love these industrial cottage-y looking racks from Post Road Vintage on etsy. I want one for a little corner of the wall above our guest bed. They're a little out of my budget right now, but with all the scrap wood I have laying around in our garage, I figured it wouldn't be too difficult to make one of my own. I just found the perfect cast-iron hooks on eBay for only $15 (with shipping).


I'm hoping they're as rusty in person as they appear online! I'm going to try my hand at using both stain and paint on this project, as I want to give it whitewashed appearance over reclaimed wood (of course, if I could find real reclaimed wood, I'd be very happy). I plan to make a hanging mason jar (like the ones that are becoming wildly popular from Pottery Barn), and I may try to find a woven tote as well but we'll see how it comes together.

I'm coming in waaaaaay under budget for this revamp (HOO-RAY!) so thankfully I'm able to add a few more decorative accessories here and there. The fabric, pillow inserts, and curtains have all been ordered. Speaking of which, here's how the color and print scheme are coming together. Lemon Drop curtains from JC Penney, Day Lily pillows from Pottery Barn, leaf fabric from Fabric.com.


And here's that gorgeous leaf fabric going to work as a new pillow cover!


I haven't decided if the chair is going to stay there or not, so we'll see where it ends up. I still need to buy supplies for my PVC-pipe curtain rods and I saw a nightstand at Goodwill that I'm going to go back for. Last but not least will be the mattress. I'll continue to show you little bits and pieces of the make-over as it goes on, but I'm keeping most of this one a secret until the big reveal!

April 23, 2010

Homemade giveaway winner

Okay, not the most popular giveaway. Only four entries for one of my DIY French grainsack pillows and teeny tiny signs. But hey--four is better than none! ;) Congratulations...


The Lucky One! Look at that! Good thing you took another chance at one of my giveaways! Random.org selected you as the winner of my homemade giveaway. Please send me an email and we'll start coordinating your prizes!

April 19, 2010

Free artwork is the best kind

Let me begin by just saying thank you all for your support and for letting me vent. I like to think it's very rare when I throw myself a pity party via the blog (believe me, I have plenty in private) but lately the stress of the deployment has really caught up with me. So thank you all for your sweet comments!

But onto redecorating matters, in an effort to save money and add a little whimsy to our guest room, I DIY'd some artwork with a little help from The Graphics Fairy. You won't want to save my images since they're compressed, but she has full sized ones perfect for printing!


I like how three of them look like they're from the same book or magazine while the other two look like they joined the collection later. Since we have birds going on down in the living room, my hope is by carrying them into the guest room it will help marry the two levels of our house--that's how it works, isn't it?? ;)

I love how vintage the pictures look on their own, but after I cut them out I rubbed the edges with black stamping ink to make them look even more aged.


Throw in my $2 IKEA frames (is there anything better than those simple RAM frames? I love them!), some colored card stock for matting, and voila!


Free artwork! And a super easy, super quick, almost fool proof way to hang them? Use the inserts as a guide!

(Forgive their rumpled appearance. I'd already semi-disposed of them when I realized what a great idea this would be!)


Just tape them up in the position you want, then go back and add a nail to each corner. Since the paper insert is the same size as your back opening, this will (almost) guarantee that your nails go in the right spot the first time!


And there we go. Free artwork printed for our home printer, $8 in IKEA frames (because I only had to buy four of them), and a lot of leftover card stock. That's what I call budget friendly!

April 17, 2010

Let me tell you a little bit about MY day...

I set out for my mom's and the post office this morning around 10 am. While on the freeway, a rock bounced up and nicked my car windshield. Nice little crack in it now.

Got to the (first) post office ready to ship a few things out, most importantly, a CARE package for Jason. I waited in line holding two huge boxes (and probably giving myself Carpal Tunnel in the process) only to be told that since it was Saturday I couldn't send anything out. They only did pick ups. I looked at the lady flabbergasted and said, "Why not? You're the post office!" She just shrugged, which made my blood absolutely boil. Even more so because I had specifically gone online to make sure they had Saturday hours. That's when it dawns on me and I say, "You need to put this kind of information on your website!" She said there was no reason to get upset to which I said, "Yes there is. I'm trying to send a package to my husband in Afghanistan." I turned to leave and realized the other post office patrons were looking at me with some sympathy in their eyes. Someone even asked if they could help me to the car with my boxes. I started crying and said no thank you.

I arrived at a second post office (where I could send things out on Saturday) and the lady behind the counter asked how I was doing. I immediately started crying again and she asked, "What's wrong sweetheart?" I just looked at her with big fat tears in my eyes and said, "Thank you for being open on a Saturday." Then she looked down and saw what I was sending and asked how long Jason had been gone, to which I pitifully blurted out, "Only a month!" She just smiled and said, "Well, I know when it comes to getting packages to those boys every day counts." I started crying so hard she had to give me tissues.

Once I was assembled with my mom, step-dad, and step-sister, we headed for IKEA to pick up the bed for our guest room plus a few other essentials. They were out of the picture frames I wanted, out of stock on the lamp I wanted, and in the self-serve furniture section my mom dropped a box on my head so hard I now have a bump and a throbbing headache. We made it back to our house, started to walk inside and Mom opened her door so hard she knocked me into the flower bed as I was walking by. Then while we were setting up the bed, she stepped on my toe.

But at least we have a guest bed.

April 14, 2010

i promised you another giveaway!

**THIS GIVEAWAY IS NOW CLOSED**

To thank all of you for not harping on me when I promised you a living room reveal (and then didn't deliver) I wanted to hold another giveaway. Only this time, I want it to be something that I made for you!


UP FOR GRABS:
One (1) grand prize winner will receive one of teeny tiny signs. These little guys are perfect for filling in those gaps in your vignettes. They measure about 9.5" x 2.5" (length x height). You can see how I make them here (towards the bottom).


You get to choose the design! Not into sweet tea? How about lemonade? I made this one for our guest room based off an old tin sign.


More into apples? Eggs? Want a little French saying? You let me know and I'll do my best to accommodate you!

Also included is one of my DIY French grain sack pillow covers (insert not included).


This pillow comes with a envelope closure (not shown on pillow above) and can be made in your choice of size: 14" x 14", 16" x 16", or 18" x 18" (all measurements done in inches). The fabric is called "Osnaburg Natural," which is a nice cotton/burlap color (see close ups of the fabric here). You can choose to have the stripes done in a color to match your home's decor. Also, if you'd rather have stripes on the ends of the pillow versus in the center that can be done too!

HOW TO WIN:
Just leave a comment on this post! That's all! You don't have to blog about it (but sharing is caring), you don't have to be a follower (but I ♥ my followers), and you don't have to jump through hoops (but if you decide to, take a picture!).

THE FINE PRINT:
  • Giveaway begins today April 14, 2010 and closes April 21, 2010 at 11:59 PM Pacific. Drawing will be held Friday April 23, 2010.
  • Winner will be determined by Random.org.
  • One entry per person.
  • Giveaway is open to U.S. residents only.
  • Please allow 2-3 weeks post drawing to receive your goodies. This will give us time to consult and give me time to create!
  •